RSS

Category Archives: Desserts

Nutella Fudge

I made this with my friends Megan and Steph last December and it was amazing! Very rich and easy to make. The sea salt adds a special something, so be sure not to leave it out! I first found this at Two Peas and Their Pod, but it directs you to Tasty Kitchen for the recipe.

Nutella Fudge
Recipe from Tasty Kitchen

Ingredients

  • Cooking spray
  • 14oz can sweetened condensed milk
  • 1 tsp vanilla extract (we used Mexican vanilla extract and I highly recommend it)
  • 8 oz high-quality bittersweet (60%) chocolate chips
  • 1 cup Nutella at room temp.
  • 3 tbsp unsalted butter
  • Sea salt

Directions

  1. Spray an 8′ x 8″ baking pan. Line with parchment paper, leaving overlap on each side.
  2. Set-up a double boiler*. Keep the water just simmering.
  3. Add the chocolate chips and stir until almost melted. Stir continuously to prevent burning.
  4. Add the milk, vanilla, nutella, and butter, stirring constantly until the mixture is smooth.
  5. Scrape the mixture into the prepared pan and spread smooth with a spatula. Sprinkle with sea salt and refrigerate until firm (about 2 hours).
  6. Once the fudge is firm, try to lift out the parchment paper and fudge. STOP if you notice and resistance – run a knife under hot water and then run it along the edges of the pan to loosen the fudge. Once it is lifted out, peel off the parchment paper and cut the fudge into 3/4: squares. Store in the refrigerator.

*To make a double boiler, take a large pan and fill the bottom with a few inches of water. Bring to a simmer. Place a glass or ceramic bowl on top – it should be slightly bigger than the pan so it won’t fall in, but not too big that it could roll off. This allows you to melt chocolate or heat milk without it burning – you should never melt chocolate directly in a pan. The water in the pan should NEVER touch the bottom of the bowl – if it does you either used too much water or too small of a pan.

 
1 Comment

Posted by on January 13, 2013 in Candy, Desserts, Holiday


Thanksgiving

I am so excited right now – I don’t know if it is from the mug of coffee I just finished or because I have found so many amazing recipes for Thanksgiving that I just can’t wait to share! Every year my parents host Thanksgiving. About 8 years ago I asked if I could help cook. This was around the same time I became very interested in nutrition, so my ulterior motive was to turn our traditional WI thanksgiving into a more wholesome, healthful, and nutritious meal.  Thankfully that first successful year has turned into tradition of homemade pies, fresh vegetables, and made-from-scratch cranberry sauce.

Each year I search for new recipes to try. In the last few weeks I have found dozens of fall dishes that I can’t wait to try (but will likely have to with this thing called medical school in my way). Here are some of the favorites I have found so far. As I make them, I will post the recipes with notes about how they were.

Brunch

Sides

Dessert

Breads

Leftovers


Tags:

Banana Walnut Almond Ice Cream

The day after I posted about purchasing an ice cream maker I spent a few hours in the kitchen trying to come up with the perfect recipe. I had read that using low-fat options, like skim milk, made the ice cream more ice than cream. I had read of some success people had with 2% milk and half-and-half, so I I thought I would start there. Instead of 2% milk I wanted to try Vanilla Almond Milk – the fat content is about the same, but the calories in almond milk are almost 1/2 AND the almond milk already had the vanilla flavoring and sugar, saving even more. The half-and-half was just because it is hard for me to purchase real cream (that will have to change).

So I began my simple recipe of 2 ingredients. I removed the bowl from the freezer and put the lid on to star the machine. The directions said it should be running when you add ingredients to prevent sticking. I added about 1 1/2 cups of almond milk and 1/2 cup of cream to my running ice cream maker.

As you can see from the picture the “ice cream” was more like ice milk. It had vanilla flavor but was not creamy. I was disappointed, but not defeated. We had tried banana ice cream in the food processor a few weeks ago and I remembered how thick and creamy the banana dessert was. We had a few ripe bananas on the counter, so I grabbed two, mashed them up and added them to the mix. I let it run for another 20 minutes. The mixture was creamier but also runnier since the bananas hadn’t been frozen.

I remembered another trick I had read on a blog somewhere – freeze the mixture in ice cube trays for later. I grabbed an extra ice cube tray and filled it up the mixture. The next day J and I decided to give it a try. We popped out 8 ice cubs of banana-vanilla-almond ice cream and put them in the food processor. I then addded about 1/4 cup of walnuts. I pulsed the mixture until it looked like a crumbled mess. Then I turned it on and let it go. The mixture will eventually turn into a ball and then smooth out. The final result (after about 2 minutes of running) was this:

Pretty nice, huh? The texture and taste were just like ice cream but not as sweet, so we both felt satisfied after our serving. I was quite pleased for my first attempt. The walnut pieces were still pretty big, so if I did this again I would first blend the walnuts into a walnut butter and then add the cream mixture. You could also use peanut butter instead. I will cotninue to experiment and be back with more recipes (possibly some that include real cream).

 
Leave a comment

Posted by on July 29, 2012 in Desserts


Homemade Frozen Desserts (WITH an ice cream machine)

At first glance, the title might appear to be a duplicate post from last month. Note the subtle difference… “WITH.” That is right, we got an ice cream machine. After a quick search on Craigslist I found a new, still in the box, 1.25 quart ice cream machine for only $20. A simple request of $15 for the machine if the seller could meet  that day resulted in us driving away with our own ice cream machine just a few short hours later.

We decided to get this ice cream machine for two reasons (besides the great price). First, the non-machine methods are time consuming and aren’t quite the same as the real thing. Second, the “real thing” is just too sweet for me. Don’t get me wrong, sweet is delicious, but that is just the problem. Something that sweet is just too hard to say, “no” to when it stares me in the face. I want something that is subtlety sweet and just as delicious, so that when I finish my bowl I am satisfied…not feeling like a drug addict who just needs one more. By making our own ice cream I am determined to come up with the recipe that is just that.

The non-dietitians reading this might think that this sounds crazy, but there is a method to my madness, I promise. Your taste buds change every 3-4 weeks. This is why if you give up a food for a month the next time you eat the food, it just doesn’t taste like you remember. All of our taste buds are programmed to like sweet, salty, and savory (fat), because those are the things that ensured survival back in the days of hunters and gatherers. Unfortunately, our society now has more sugar, salt, and fat at our disposal, and food companies monopolize on the idea. Most things we eat have more of these ingredients than they really need to taste good. These ingredients are cheap, so it is to the manufacturers benefits to use more than needed. Why? First, they will ensure that everyone’s taste buds are digging the food. Second, they will work to change our taste buds to like more sugar, salt, and fat, leaving us more addicted (we are fatter, they are richer).  I could go on and on, but I think you get the point 😉

I am so excited to try it out and have complied a few recipes to test. Here are just a few. If you have a favorite, please share! Once I perfect my own recipe I will take pictures and post.

Once I find the perfect recipe, I will need to make some ice cream sandwiches. August 2nd is National Ice Cream Sandwich Day, so I better get to work! Here is a list of ice cream sandwiches to try. I plan to first perfect a healthy vanilla ice cream or frozen yogurt and then scoop in between two of my favorite cookies.

 
Leave a comment

Posted by on July 25, 2012 in Cookie, Desserts


Homemade Frozen Desserts (without an ice cream machine)

I recently learned that you can use ripe, frozen bananas to  make creamy frozen desserts…why did I not know about this before?! This began my search for homemade frozen treats that I can make during this (excessively) hot summer. I have yet to try them, but I am accumulating a list and figured I’d organize them here. Most of these recipes don’t require anything you wouldn’t already have at home, but there is a new product out there called Yonanas that is like a soft serve machine.

Healthy Options

Vanilla Frozen Yogurt made with yogurt

A take on Chunky Monkey and Chubby Hubby with yogurt and bananas

Fruit-flavored frozen yogurt with jell-o and yogurt

Strawberry frozen yogurt

Bananas in a bag recipe

2-ingredient banana ice cream (peanut butter and bananas…my favorite food combination!)

Less Healthy Options (okay in moderation!)
Most of the ice cream recipes seem to need heavy cream of sweetened condensed milk. I am guessing this is due to the fact that you aren’t using a machine but still want a creamy texture. If you try any of these recipes and make healthy modifications, please share!!

Homemade ice cream in a bag

Mix and chill homemade ice cream 

Homemade ice cream in a pan

Simple sorbet

Easy mix-and-freeze ice cream

The ice cube method for making ice cream

 
Leave a comment

Posted by on July 8, 2012 in Desserts


Pecan Topped Baked Sweet Potatoes

Pecan Topped Baked Sweet Potatoes by A Year of Slow Cooking

Ingredients

  • 4 peeled and sliced (1/4 inch thick) sweet potatoes
  • 1 can whole-berry cranberry sauce
  • 1 cup nonfat evaporated milk (in a can in the baking aisle—I don’t know how fresh transfers)
  • 3/4 cup brown sugar
  • 1 tsp vanilla extract
  • 2-4 T butter (you can control the amount)
  • 1 cup chopped pecans
  • 2 cups crumbled pretzels

Directions

  1. Spray a 4qt crock pot with cooking spray.
  2. Peel and slice the sweet potato and stagger-stack in your crockpot. Cover with the 3/4 cup of brown sugar. Open the can of cranberry jelly and squish it out all over the top of the sugar and potatoes.
  3. Mix the 1 tsp of vanilla with the cup of milk, and pour over the entire top.
  4. Slice the butter, and dot it on top.
  5. Crumble the pretzels and mix them with the chopped pecans. Sprinkle over the top.
  6. Cover and cook on low for 5-6. This is done when the sweet potatoes have reached desired tendency.
  7. Unplug and uncover. Let sit for 15 minutes before cutting into.
 

Berry Trifle

This is a super easy recipe I made for the 4th of July. I didn’t take a picture, but it looks a lot like the picture below from this website.

Ingredients:
-1 tub of low-fat cool whip
-2 boxes of fat-free vanilla pudding
-4 cups of skim milk (for the pudding)
-2 pints of blueberries
-2 pints of strawberries 
-1 ring of angel food cake (purchased or prepared on  your own).

Directions

  1. Prepare the vanilla pudding and let set in the refrigerator.
  2. Cut up the angel food cake into 1/2″ to 1″ cubes
  3. In a large bowl, mix the angel food cake and berries.
  4. Begin layering by placing a layer of fruit-cake mixture on the bottom of the dish. Top with dollops of pudding and cool whip. Repeat this layering until you reach the top of the dish.

*If you don’t have a tall dish, you can use a long cake pan and just have fewer layers.


Tofu Cheesecake

It has been a few years since I last made this recipe, so I do not have a picture.  I first made this cheesecake when I was living in Green Bay. I was hesitant to tell my roommates (and Jason) that is was actually made from tofu and not cream cheese…so I didn’t. Well, at least not until AFTER they told me what they thought. They all said how much they liked it and the cake disappeared just as fast (if not faster) than a regular cheesecake. If you are a tofu novice, I highly recommend this recipe!

Ingredients

Crust

  1. 1 ½ cup granola
  2. 1/3 cup melted butter

Filling

  1. 2 eggs
  2. ¾ cup of honey
  3. 1 tbsp almond extract
  4. 1 ripe banana*
  5. ¼ cup soy milk
  6. 1/3 cup sifted whole wheat flour
  7. 2 tbsp nutritional yeast
  8. 1 cup of crumbled, firm tofu 

Directions

  1. Pre-heat oven to 350F
  2. Spread granola evenly in a square 8” cake pan and drizzle melted butter over it
  3. In a blender, combine eggs, honey, almond extract, banana and milk; blend on medium speed.
  4. While still blended, add flour, yeast and tofu.
  5. Once smooth, pour over granola.
  6. Bake for 1 hour and allow to cool completely before serving.

*I did not use this when I did it and it worked fine.


Apple Crisp

Again, life is crazy busy and I have no pictures to share with you. I can tell you that every person who has had this dish enjoyed it and I have made it 3 times in the past 3 weeks! Usually I leave my apple peels on for added nutrition, but I eat so well already, I figured why not just peel them for the full apple crisp effect. Apple crisp is one of the healthiest fall desserts if you make it right. Plus, the main ingredient is apple, so you are getting a fruit serving (or two) in with each slice!

Ingredients

  • 7 or so medium apples, peeled and thinly sliced (they don’t all need to be perfect slices)
  • 1/3 cup brown sugar, divided
  • Cinnamon, apple pie spice, and nutmeg to taste
  • 1/2 cup regular oats
  • 1/4 cup all-purpose flour
  • 1 1/2-2 tbsp butter

Directions

  1. Preheat oven to 350F. Spray a 9″ x 9″ square baking dish and set aside.
  2. In a large bowl, toss apple slices, spices, and 2 tbsp brown sugar*. Pour into prepared dish.
  3. In a small bowl, mix flour and oats together. Add remaining sugar and additional spices, if desired. Cut in butter until it resembles a coarse meal. To use as little butter as possible, start with 1 TBSP and add more if needed.
  4. Bake for 30 minutes. Serve hot or cold.

I just found out that Jason likes his hot with ice cream but if there is no ice cream, he likes it cold…talk about high maintenance! 😉

*the apples are sweet already so you don’t really need sugar in the base. If you want, you can omit the sugar (I have done this and it still tastes great) and either remove it all together or add it to the topping for an extra sweet crunch.

 
Leave a comment

Posted by on October 23, 2009 in Desserts, Favorites, Fruit


Delicious

So, I have been totally M.I.A again…I hate how the semesters take away from my precious blogging time.My goal is at least once per week for the next 13 weeks…yes that is right, 13 weeks until graduation (or 93 days, but who is counting). After that I’ll have to come up with another excuse as to why I haven’t been posting 😉

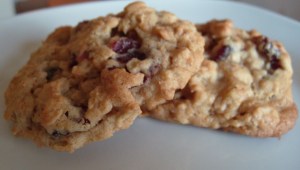
I made these cookies a few weeks ago and they are by far the BEST cookies I have ever eaten. Even better then the ooey-gooey cookies from those quaint little family-owned cookie shops that use recipes passed down from generations. The best part of this recipe is the tart cranberries with the crispy outside and chewy inside. The walnuts at just a touch of crunch to finish it off. Needless to say these did not last long.

Oatmeal-Cranberry Cookies
Makes 24-30 cookies

Ingredients:
– 1/2 cup whole wheat flour
– 1/3 cup all purpose flour
– 1/2 tsp baking soda
– 1/2 tsp salt
– 1/2 cup butter, softened
– 1/3 cup sugar
– 1/3 cup brown sugar
– 1 tsp vanilla
– 1 egg
– 1 1/2 cups oats
– 1/2 cup dried cranberries
– 1/4 cup crushed walnuts

Directions

  1. Heat oven to 350F.
  2. Mix flours, baking soda, and salt in a medium bowl.
  3. Beat butter and sugars until creamy. Add vanilla and eggs; mix well.
  4. Slowly add the dry mixture to the butter mixture, beating on low. Beat until well mixed (and then place the beaters on high to get the rest off).
  5. Add oats, cranberries, and walnuts and mix well with a rubber spatula or wooden spoon.
  6. Drop dough onto a cookie sheet; leave about 2″ apart.
  7. Bake 8-10 minutes, until edges are golden.

Nutrition Information (1 cookie): 90 calories, 4g fat, 14g carbohydrate (1g fiber), 1.5g protein

 
2 Comments

Posted by on September 9, 2009 in Cookie, Desserts, Favorites