RSS

Monthly Archives: August 2008

Yet another zucchini recipe

Zucchini is still everywhere, so I have been trying to save a little money by making dishes with it every week. This week I tried a modified version of a recipe from cookinglight.com (link to original below)

This dish is nothing short of delicious. As it was cooking, Jason mentioned it smelled like pizza. I truly think you feed this to an “anti-zucchini” person and turn them into a fan.

Not only is it delicious, it is not very high calorie at all. The cheese serves at the main protein source and contributes most of the calories. The red pepper aioli is a little more calorically dense. I do not like to use fat free mayo; I don’t think the taste is the same and there are so many added ingredients, that I would prefer to just eat the real thing. To lighted the aioli, I was thinking I could probably use some fat free plain yogurt for ½ the mayo. I thought I could substitute fat free sour cream (which doesn’t bother me because there are not as many added ingredients as mayo) for the mayo as well. If anyone tries these variations, please let me know how they are!

Zucchini Casserole with Red-Pepper Aioli
(Modified from a recipe at cookinglight.com:(http://find.myrecipes.com/recipes/recipefinder.dyn?action=printerFriendly&recipe_id=665216)


Ingredients
◦ 3 cups sliced onion
◦ 6 slices Wheat bread, toasted
◦ 28 ounces, caned, no-salt-added diced tomatoes, drained
◦ 1 tbsp fresh basil
◦ 1 tbsp fresh oregano
◦ 1/2 teaspoon dried thyme
◦ 1/4 teaspoon black pepper
◦ 1 tbsp garlic powder
◦ Cooking spray
◦ 4 medium zucchinis halved lengthwise and thinly sliced
◦ 2 cups (8 ounces) shredded part-skim mozzarella cheese
◦ ½ cup Parmesan cheese
◦ Red-Pepper Aioli (see recipe below)

Directions

  1. Preheat oven to 375°. Grease a 3 quart casserole dish.
  2. Cut 2 bread slices into 1-inch cubes; set aside.
    In a medium bowl, place tomatoes. Stir in basil, thyme, oregano, pepper, and garlic.
  3. Place 1/2 cup onion in the bottom of a 3-quart casserole dish coated with cooking spray.
  4. Arrange 2 bread slices, half of the remaining onion, half of the tomato mixture, half of the zucchini, and half of the cheese over onion in dish. Repeat layer; top with bread cubes.
  5. Cover and bake at 375° for 30 minutes. Uncover casserole and bake an additional 25 minutes or until top begins to brown.
  6. Spoon Red-Pepper Aioli over the top. Enjoy!


Red-Pepper Aioli

Ingredients

  1. 1 tbsp garlic powder
  2. 1/2 cup fat-free mayonnaise
  3. 1/2 teaspoon salt
  4. 1/4 teaspoon crushed red pepper
  5. 7 ounces of bottled roasted red bell peppers, drained

Preparation

Add ingredients to a food processor. Process all ingredients until well-combined.

 
Leave a comment

Posted by on August 31, 2008 in Casserole, Vegetarian


Chocolate Chip Oatmeal Cookies

For some reason, when I make cookies I can’t seem to leave the recipe as is; I always have to attempt to make it healthier. With that said, this is not a traditional cookie in the sense that it is more dense than flimsy. I believe the reasoning for it is that I substituted half of the butter for applesauce. When you substitute applesauce for butter, you do not get as much of a creaming effect, leaving the final product more cakey than buttery. If you prefer flimsy cookies over cakey cookies, I would suggest not omitting and butter.

If you would like to try to substitute applesauce if other baked goods you make, I would suggest using it for muffins and cakes. I have substituted applesauce 100% for these baked goods and the final product was still delicious. If you are going to use applesauce, be sure to get a no sugar added applesauce, otherwise, you are not doing yourself much good by making the substitution. Apples are naturally sweet, so if you are making muffins or cakes you could try omitting 1/4 of the sugar called for in the recipe.

Chocolate Chip Oatmeal Cookies

Ingredients
½ cup applesauce
½ cup butter
2/3 cup brown sugar
½ cup granulated sugar
2 eggs
2 tsp vanilla
1 cup whole wheat pastry flour
1 cup all purpose flour
1 tsp baking soda
1 tsp salt
½ tsp nutmeg
2 tsp cinnamon
4 TBSP milk (1/4 cup)
4 cups oats
1 ½ cup chocolate chips

Directions

  1. Heat oven to 325F
  2. In a large mixing bowl, cream sugars and butter. Add in applesauce. Beat in eggs one at a time and then add vanilla.
  3. In a separate bowl, combine next five dry ingredients. Add to the creamed mixture alternately with milk.
  4. Mix in oats and then the chips.
  5. Bake on an ungreased cookie sheet for 12 minutes.
 
Leave a comment

Posted by on August 29, 2008 in Cookie


Crock Pot Pork Chops

Cooking with a crock-pot is probably the easiest thing I have ever done. The whole hands-on process takes about 15 minutes and you need to try pretty hard to mess it up. We like to cook crock-pot meals on days when I work during the day and Jason works at night and needs to take a lunch.

Most of my crock-pot meals are just thrown together and don’t follow a recipe; I usually use whatever we have lying around.

Ingredients
-2 pounds red potatoes, halved
-4 whole carrots, chunked
-1 large white onion, diced
-2 large zucchinis, cut into discs
-3 pork chops (a little more than 1 pound)
-1 tsp ground cloves
-1 tsp garlic powder
-1 tsp oregano
-water

Directions

  1. Add about 1/2 the vegetables to the crockpot; add the pork chops in a layer and cover with seasonings. Top with the remaining vegetables. Add about 1/2 cup of water. You can add more if you would like, or you can add some later on.
  2. Cook on low for 7-8 hours. I usually check on it 1/2 way though to see how it is looking. As long as the pork reads 165F (which is will FOR SURE after 7 hours!) it is done. The longer you cook it the more the flavors blend together.
 
Leave a comment

Posted by on August 26, 2008 in Crock Pot, Meat


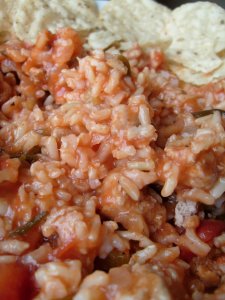
Spanish Rice

At my bridal shower, my bridesmaids had the coolest idea…since they know I love to cook, they had each person attending bring a recipe for me to try out on Jason. One of them was for Spanish Rice from my Aunt Diane.

I made a few modifications, such as using fresh parsley instead of dried and using whole grain rice instead of white rice. Overall, the recipe is good. The only thing Jason suggests is more spice, and I agree. I would probably add some cumin and chili powder.

Ingredients
◦ 1 pound ground meat, browned
◦ 1 celery stalk, thinly sliced
◦ 16 oz can stewed tomatoes
◦ 1/4 cup onion, diced
◦ ¾ ketchup
◦ 2 tbsp fresh parsley
◦ 1/8 tsp black pepper
◦ 1 cup Brown rice (uncooked)
◦ 2 cups water

Directions
Mix all ingredients together in a pan; cover and simmer for 3/4 of an hour to 1 hour, stirring occasionally.

 
Leave a comment

Posted by on August 24, 2008 in Grains, Meat


Fruited Chicken Salad

I have never been a fan of traditional chicken salad; something about the thick creamy dressing and obvious mayonnaise taste seemed to turn my off every time I tried it. Recently, Jason and I have experimented with less traditional types of salads. Here is a recipe for my most recent invention. We have also made a similar salad with turkey that I will post about in the future when we make it again.

Ingredients
-2 medium chicken breasts, cooked and cubed (about 2/3 of a pound)
-1 very ripe mango*, peeled, cored and cubed
-1 orange, sliced and cubed
-1 cup of grapes, halved
-2 large celery stalks, sliced about ¼” thick
-½ cup fat-free, plain yogurt
-2-3 tbsp lemon juice

Directions

  1. In a small bowl, mix the lemon juice and yogurt.
  2. In a large bowl, mix the remaining ingredients.
  3. Pour dressing on top and mix until everything is well coated. If desired, add more yogurt and/or lemon juice to taste.
  4. Serve with fresh greens, on toasted whole wheat bread, or by itself!

*While in India last August (I can’t believe it has been a year already!) I had the BEST mango of my life; they were so juicy we could peel them with our hands. The flesh was a deep orange color, unlike the traditional yellow color you often find here. However, Jason and I, in an attempt to save money, have started going to Aldis for some of our grocery needs. There we got the BEST mango I have ever had in the US; the sticker was in Spanish, so I am assuming they were mangos from the local Spanish grocery store. Regardless, they were 100 times better than the mangos I bought at Jewel earlier this summer. Just a hint: when shopping for mango, try to find one that is soft and smells like mango; this means it is at perfect ripeness! Enjoy!

 
Leave a comment

Posted by on August 22, 2008 in Chicken, Fruit, Salad


Homemade "Hummus"

While I am not sure what specific ingredients specifically make hummus, hummus, I personally think it is the chickpeas. With that, I am calling this concoction hummus, even though there is no lemon juice or Tahini. Jason and and I really like hummus for sandwiches and dipping bread and vegetables in. I had planned to make a sun-dried tomato and basil pasta one week, but it didn’t work out, so I decided to use the ingredients for this dip.

When we first started making our own hummus our recipe usually just included 1 can of drained chickpeas, and Zesty salad dressing (sun-dried tomato, Italian, etc…). This recipe isn’t much different.

Ingredients:
-1 can of chickpeas, drained, or dry chickpeas, soaked and cooked.
-Ready-to-use Sun Dried Tomatoes
-Fresh Basil
-Sun-dried Tomato Dressing
-Sunflower Seeds

Directions:

  1. In a food processor, add the chickpeas, a handful of sun-dried Tomatoes, about 1 tbsp fresh-packed basil, a splash of salad dressing, and about 1/4 cup of sunflower seeds.
  2. Process on high until smooth – you may need to scrape down the edges and stir a little so it is all blended.
  3. Taste to see the flavor at this point. If it is runny, add more chickpeas or sunflower seeds. If it is dry, add more salad dressing. If it is bland, add more basil and sun-dried tomatoes.
  4. Blend with added ingredients and repeat process until the final product is as you like it.


Green Bean and Tomato Salad

This is one of my favorite side salads. It is full of flavor, but only takes about 15 minutes to make. I guarantee you will enjoy it!

Jason always told me he hated Balsamic Vinaigrette. We would be having a salad with dinner and when I asked what kind of dressing he would like he always would say, “anything we have except balsamic.” I decided I would play a little trick on him when I made this salad and not mention what the dressing was. Instead, I just asked him to taste it since it was for the next nights dinner. His response…”that is so good!” My response…”I told you that balsamic vinaigrette isn’t that bad.” Needless to say he easily ate half of the salad over the next few days 🙂

Delicious Green Bean and Tomato Salad
Ingredients
1 pint of grape tomatoes (you could also use cherry tomatoes, I just prefer grape)
1 pound roma tomatoes
1 pound fresh green beans
Feta Cheese
Balsamic vinaigrette salad dressing

Directions

  1. Halve the grape tomatoes and place in a large bowl.
  2. Cut the ends off the green beans and then cut the green beans into halves, thirds, or quarters, depending on the size. Add to the large bowl.
  3. Cut the Roma tomatoes in half lengthwise. Holding the tomato together, rotate it on the cutting board and cut it in half lengthwise again. Still holding the tomato together, slice it into 1/4″ thick pieces. Add to the large bowl.
  4. Add about 1/4 cup of dressing to the bowl and stir well. Add more if needed.
  5. Add about 1/4 – 1/3 of the crumbled feta cheese package to the bowl and stir until evenly distributed. Again, add more if desired.
  6. Refrigerate for at least 1 hour or up to 5 (possibly more, but ours didn’t last that long) days.


Zucchini Boats

With Zucchini being in season, I have been finding TONS of recipes for ways to use them up. This recipe was one I found at Rachel Ray’s website: http://www.rachaelraymag.com/recipes/salad-vegetable-recipes/cheesy-zucchini-boats/article.html. While I didn’t do more than read the recipe once, now that I look at it again, I realize it is almost the same! If you need ideas for weekly meals, you can sign up to get e-mail with a menu planner and shopping list from her website (http://www.rachelraymag.com/). While I haven’t used these yet, I do get some good ideas for some dinners during the week.

Zucchini Boats

Ingredients
– 3 medium size zucchinis
– 1 small vidalia onion
-10 grape tomatoes, sliced
– Olive oil (1-2 tbsp)
– 1 large garlic clove, minced
– Mrs. Dash Table Blend
– 1/8 cup freshly grated Parmesan cheese
– 1/4-1/2 cup shredded, part-skim mozzarella cheese

Directions

Slice the zucchinis in half lengthwise. Place them in a microwave-safe dish and microwave on high for 3 minutes, until the centers are slightly softened.

With a knife, cut into the zucchini, leaving about 1 cm of the “boat” skin. I made a guide line down the middle and at an angle on each side. With a spoon, gently scrape the flesh out and set aside (do not discard).

Blot the water out of the zucchini shells and place them on a greased pan.

Chop the zucchini flesh into smaller, 1/2″ pieces. A rough chop will do.

In a skillet, heat 1/2 tbsp of oil. Add the zucchini and cook down. Transfer the zucchini to a strainer and push out as much liquid as possible.

In a larger skillet, heat 1/2-1 tbsp oil. Add onion, zucchini, garlic, and any other desired seasonings (I used Mrs. Dash Table Blend). Cook until onions are tender. Turn off heat and add the sliced tomatoes. Set aside.

Turn the broiler on. Add the grated Parmesan cheese to the filling mixture and stir well. Add the mixture to the zucchini boat shells. Top with shredded cheese.

Broil for 5 minutes, or until the cheese is lightly browned. Serve warm with garlic toast and marinara sauce (if desired…I thought it was tasty!)

 
Leave a comment

Posted by on August 13, 2008 in Vegetarian


All caught up!

Whew…these last few weeks have consisted of a whole lot of posting! Today we leave for a four day camping trip, during which I obviously won’t be posting. As the semester nears, the time I have for cooking different types of meals will most likely also diminish slightly.

This post is just a heads up for any (if there are any…) frequently readers that I will not be posting as frequently as I have been. However, I will try to post at least twice per week; if not a recipe, something related to nutrition. Who knows, maybe I will get back to the original purpose of the blog: to provide information about nutrition so you can improve your health and embrace life!

In the meantime, I would appreciate any comments anyone has about what they would like to see from this blog. Do you enjoy the recipes? Would you prefer more posts on nutrition? What about nutrition would you like to know?

The weather looks like it should be perfect these next couple of days; I challenge all of your reading this to go outside and be active for at least 45 minutes today. The sunshine on your skin will all vitamin D to form (http://www.vitamindcouncil.org/vitaminDPhysiology.shtml), which is necessary for good bone integrity (http://www.medicalnewstoday.com/articles/34098.php). It has also been shown to possibly decrease depression and increase mood (http://www.vitamindcouncil.org/depression.shtml). If that isn’t enough, a little summer glow never fails to make people feel happier 🙂

 
Leave a comment

Posted by on August 9, 2008 in Uncategorized


Sweet and Spicy (American) Chinese

Earlier I posted about wanting to make spring rolls but never getting around to it. I don’t really like soy sauce, so I never knew what sauce I could put on them. Recently, I came across tons of amazing food blogs, one of which [cook (almost) anything at least once] had a great recipe for sweet chili sauce. It seemed simple and I have always wanted to try to make my own sauces, so I figured I would give it a try. The results were delicious.

A word of caution before you start: do NOT scrape out the seeds and membranes of the peppers with your bare hand! I never worked with this kind of pepper before and had no idea about the consequences; my hand burned for over a day and ever part of my body that I touched with it burned too! I tried many wives tales, but the best solution to the burning hand was some freshly squeezed lemon juice…this worked for about 4 hours. The Mexican lady I work with suggested peeing on my hand; I guess this works for every kind of irritation! Since I was working that night (waitressing at Ruby Tuesday) I figured I better not try that method!
Sweet Chili Sauce
Ingredients:
– 10 large chillies (I used Serrano)
– 1½ cups plain sugar
– 2/3 cup Chinese Rice Wine Vinegar
– 1 cup water
-1/4 cup molasses
Directions:
Prepare the chillies:
  1. Slice the chillies lengthwise and with a gloved hand, remove the membranes and seeds. This is the part with a lot of spice in it, so if you want this to be very hot, you can leave some of this in.
  2. Dice the chillies into uniform pieces.
Making the Sauce:
  1. In a sauce pan, combine chillies and remaining ingredients; simmer for at least 30 minutes.
  2. Taste the sauce to determine spiciness; if it already seems too spicy, remove chillies and continue to simmer.
  3. The longer the sauce simmers, the thicker it will get. Remember, once it is refrigerated, it will thicken even more. We simmered ours for 40 minutes and it is now at a consistency of a thin molasses.
Spring Rolls
Ingredients:
-Spring roll wrappers
-1/2 head cabbage, chopped
-3 large carrots, grated
-2 pounds of cooked, diced chicken
-1 bunch of green onions, diced
-non-stick spray
-water in a bowl
Directions:
  1. Preheat oven to 350F.
  2. Spray two large baking sheets with non-stick spray.
  3. In a large bowl, combine all of the ingredients and mix well.
  4. Position the spring roll wrapper like a diamond with a point facing you.
  5. In the center of each spring roll wrapper, place about 1/4 cup of the mixture (more if it will fit).
  6. Fold the bottom corner of the wrapper up and the two side corners in. To finish, fold the top corner down and hold it there. If desired, you can seal this with some water (just dab your fingers in the water and work it into the area where the points meet). Holding the spring roll in place, pick it up and flip it over onto the baking sheet, so the folded area is hidden.
  7. Spray the tops of the spring rolls with the non-stick spray, so they will crisp-up more.
  8. Bake for 10-12 minutes until lightly browned.
  9. Serve with sweet chili sauce and enjoy!
 
1 Comment

Posted by on August 8, 2008 in Chicken, Favorites